JAVA基础系列,包括:
- 数据类型
- 流程控制与数组
- 面向对象
- 基础类库
- 异常
- 注解
- 反射
- 输入输出流
- 多线程
- 网络编程
数据类型
标识符命名
Java标识符必须以字母、下划线(_)、美元符($)开头,后面可以跟任意数目的字母、数字、下划线(_)和美元符。
Java关键字
| 类型 | 关键字 |
|---|---|
| 访问控制 | private、protected、public |
| 类,方法和变量修饰符 | abstract、class、extends、final、implements、interface、native、new、static、strictfp、synchronized、transient、volatile |
| 程序控制 | break、continue、return、do、while、if、else、for、instanceof、switch、case、default |
| 错误处理 | try、catch、throw、throws |
| 包相关 | import、package |
| 基本类型 | boolean、byte、char、double、float、int、long、short、null、true、false |
| 变量引用 | super、this、void |
| 保留字 | goto、const |
基本数据类型
- 整型
- byte: 内存占8位,表示范围-128~127
- short: 内存占16位,表示范围-32768-32767
- int: 占32位,表示$-2^{31}$ - $2^{31}-1$,默认定义的数字是int
- long:占64位,表示$-2^{63}$ - $2^{63}-1$
- 字符型
- char:Java使用16位的Unicode字符作为编码方式,也就是2字节,使用单引号(‘)包含。
Java并没有提供表示字符串的基本类型,所以字符串使用String类来表示,使用双引号(“)表示。
- 浮点型
- float: 单精度浮点型,占4字节,32位
- double: 双精度浮点型,占8字节,64位
-
数值下划线分隔 Java7引入的新功能,数字可以使用下划线进行分隔,便于直观看出有多少位。如:
3.14_15_92_654 - 布尔型 boolean: 表示逻辑上的”真”或”假”。数值只能是true或者false,不能用0和1表示,其他类型的数据也不能转化成boolean类型。虽然boolean只需要一位就可以表示了,但是由于计算机通常使用8位作为内存最小分配单位,所以大部分情况下占用还是8位。
流程控制与数组
流程控制
- if-else结构
- switch分支结构,如:
1
2
3
4
5
6
7
8
9
10
11
12
13
switch (expression){ case condition1:{ func(condition1); break; } case condition2:{ func(condition2); break; } default:{ func(1); } } - while结构,如:
1
2
3while(expression){ func(expression); } - do-while结构,如:
1
2
3do{ func(); }while(expression); - for循环结构,如:
1
2
3for(int i=0;i<10;i++){ System.out.println(i); }
数组
-
定义
Java定义数组时,以下两种定义方式都支持:
1
2type[] arrayName; //推荐使用,语义清晰,引用类型 tpye arrayName[]; -
初始化
- 静态初始化
1
intArr = new int[]{5, 6, 7, 8}- 动态初始化
1
intArr = new int[5]; -
使用
- 获取长度: arr.length
- foreach循环:
1
2
3for(String book : books){ System.out.println(books); }
-
Java8增强的工具类Arrays
Java提供的Arrays类包含了一些static修饰的方法可以直接操作数组,详情可以自己看文档。
面向对象(上)
类对象
Java中定义类和C++差不多,类似如下:
1 | |
注意: Java中一个.java文件只能拥有一个public的类。对于各种修饰符类的访问权限在后面进行介绍。
对象、引用、指针
Java中使用对象如下:
1 | |
注意到代码中的p变量和Person对象,p变量其实是个引用,这个变量存储在栈中,而真正的对象Person存在堆中,p变量是对Person对象的引用,这和其他语言是一致的。引用和指针很像、但是引用和指针有区别(注意Java中的null很特殊,虽然可以使用p=null这种语法,但是并不能说p为空,关于Java中null的详细定义网上议论纷纷,还需继续深入学习):
- 引用不可用为空,指针可以为空。
- 引用在创建时必须初始化,引用到一个有效对象,而指针在定义时不用。
- 引用初始化以后不能被改变,指针可以改变所指的对象。
通过this引用可以在类的内部引用本身。
局部变量初始化
Java中可以使用{}对类的成员变量进行初始化。在定义一个局部变量的时候系统并不会为之分配内存,只有赋值后系统才会分配内存。
访问控制
graph LR;
id1([priavate]) --> id2([default])
id2 --> id3([protected])
id3 --> id4([public])
注意 访问级别由小到大。
访问控制级别表
| private | default | protected | public | |
|---|---|---|---|---|
| 同一个类中 | √ | √ | √ | √ |
| 同一个包中 | - | √ | √ | √ |
| 子类中 | - | - | √ | √ |
| 全局范围内 | - | - | - | √ |
包管理
pacakge、import和import static
Java中允许使用pacakge对一组相同功能进行管理,但是要满足两个条件:
- 源文件使用package语句指定包名。
- class文件必须放在对应的目录下。
使用import语句可从其他包中导入类,使用import static可从其他包的类中导入静态方法或者静态属性。
构造器
Java构造器和C++也类似。不过要注意,构造器代码进行之前,系统已经为对象分配好内存空间了,只是暂时还不能访问而已,构造器只是可以对这个对象进行初始化操作而已。使用this关键字可以在重载的构造器中调用另一个构造器,并且必须作为构造器执行体第一条语句。
继承
使用extends关键字进行类的继承,而且只能单继承,如下:
1 | |
使用super关键字可以使用父类的资源。当程序创建子类时,如果存在同名的实例变量,则系统会为他们都分配内存,而不是只分配一份。
多态
Java引用变量有两个类型,一个是编译时类型,一个是运行时类型。编译时类型由声明该变量时使用的类型决定。运行时类型由实际赋值的类型决定。因此就有可能出现多态。比如Dog、Cat都继承了Animal。则声明以下代码时:
1 | |
由于猫狗的叫声不一样,所以可能出现“汪汪汪”和“喵喵喵”的区别。
注意 使用instanceof可以判断对象是否是某种类型,方便正确进行多态转换。只要是类型相同或者具有继承关系则返回true。如:
1 | |
面向对象(下)
Java8增强的包装类
JDK1.5开始提供了自动装箱和自动拆箱的功能。Java中对8种基本数据类型提供了包装类。如下:
| 基本数据类型 | 包装类 |
|---|---|
| byte | Byte |
| short | Short |
| int | Integer |
| long | Long |
| char | Character |
| float | Float |
| double | Double |
| boolean | Boolean |
对象比较
由于包装类对象其实是引用类型,所以以下代码会输出false:
1 | |
但是由于Java可以自动装箱,以下代码会输出true:
1 | |
因为在Java中对-128–127做了缓存,所以a和b其实是一个对象。同理也可以应用到Java的字符串对象,Java对字符串常量做了常量池管理,所以如果是静态定义相同的字符串值是相等的,但是字符串运算或者new出来的即使值相等,==也是false。如下:
1 | |
所以要想比较两个值相等,应该使用equals方法。
final修饰符
final修饰的变量不可被改变,一旦获得了初始值,该final变量的值就不能被重新赋值。而且final修饰的成员必须由程序员显式赋值。final修饰的成员不可重新赋值,但是如果改成员是一个引用对象,那么引用对象的成员是可以改变的。final在Java中的作用其实相当于C++中的“宏定义”。下面我们来看一个例子:
1 | |
代码和上面的差不多,区别就是给s2和s3加上了final修饰的关键字,现在执行,你会发现s4和s1输出的是true而不是false。这是因为final修饰的值是编译时就已经确定的,所以会纳入常量池。
抽象类
先看一个抽象类的例子:
1 | |
Java中的抽象类使用abstract关键对抽象类进行定义。抽象类可以理解为一个模板,可以提供一些已经实现的方法,以及定义一些必须实现的抽象方法。这个模板不能被实例化,必须要被其他类继承并实现对应的抽象方法后才能进行实例化。由于abstract必须被继承实现,因此他和final、static、private有一些互斥关系,这个需要想清楚。
接口
先看一个接口的例子:
1 | |
Java中的接口使用interface关键字进行定义。接口可以理解为规范,这和抽象类的模板不同。相当于电脑上有内存条插槽,你只要实现了相关的内存条制造规范,那你就能插上电脑使用。这个主要是弥补Java单继承的不足,因为接口可以同时实现多个。这里放一下接口和抽象类的区别:
- 接口只能包含抽象方法和默认方法,而抽象类可以提供普通方法(至于默认方法和普通方法的区别?感觉这个默认方法就是个大坑,其实是因为Java中一些接口更新导致新版本编译不过的而提供的一个补救措施,但是却带来了多继承的问题,详情请自己了解,主要就是记住,少考虑默认方法,多继承下类方法优先)。
- 接口里不能定义静态方法,抽象类可以(书上是这么说的,但是Java8增强了,接口可以定义static方法,做加法真是害死人啊)。
- 接口中定义的成员属性都是静态的,而抽象类可以提供普通变量。
- 接口不含构造器,抽象类可以。
- 接口不能有初始化语句块,抽象类可以。
- 接口可以多继承,抽象类只能单继承。
内部类
可以在内的内部再定义类,主要是为了更好的封装,如果只是一次性使用的类可以使用内部类进行定义。内部类中使用外部类名.this.varName对外部类进行访问。
Lambda表达式
Lambda表达式是Java8的重要更新,其实就是用更简洁的代码来创建只有一个抽象方法的接口(又称之为函数接口)。相比起Py的lambda表达式,这个语法真是太尴尬了。例如:
1 | |
枚举类
和其他语言都差不多,直接举例吧:
1 | |
基础类库
基本库
Java的基础类库都是一些方法的调用,需要手动实践理解。其中提供了包括系统相关(System、Runtime等)、字符串相关(String、StringBuffer、StringBuilder等)、对象(Object)、数学(Math、BigDecimal等)、日期(Date、Calendar等)、正则、国际化等等。
1 | |
集合
-
概述
Java中集合类型主要由两个接口派生:Collection和Map。详情查看下面的的图:
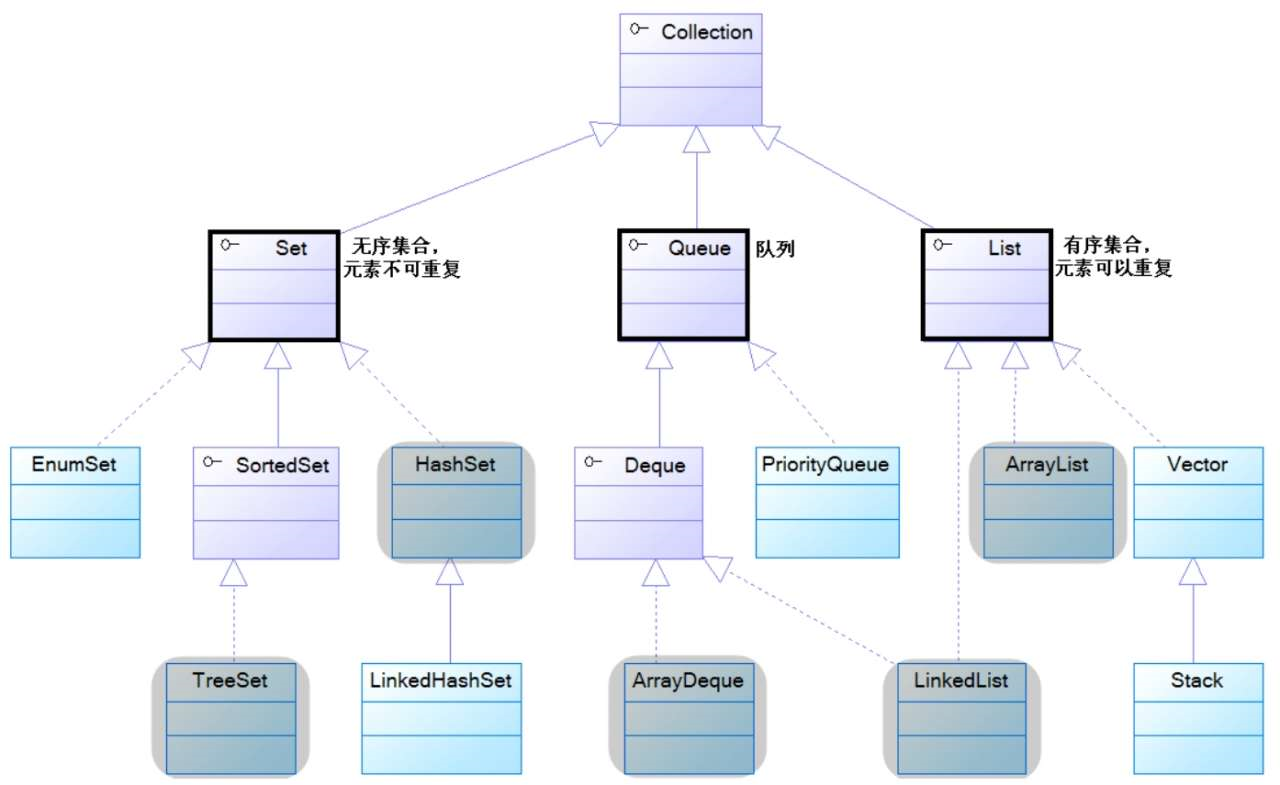
Collection中定义了一些基本方法,如add、clear、contains等。同时可以使用Iterator迭代器进行元素迭代,如下所示:
1
2
3
4
5
6
7
8
9
10
11
12
13
14
15
16
17
18
19
20
21
22
23
24public class JavaSet { public static void main(String[] args) { Collection c = new ArrayList(); c.add("Java"); c.add(100); c.add(100); System.out.println(c.size()); System.out.println(c.contains(100)); System.out.println(c.toString()); c.forEach(obj-> System.out.println(obj)); Iterator it = c.iterator(); while (it.hasNext()){ System.out.println(it.next()); if(it.next().toString().equals("Java")){ it.remove(); } } } }同时Java还支持链式操作,如下:
1
books.stream().filter(ele->((String)ele).contains("Java")).count(); -
Set
Set是一个元素不重复的元组,在Java中有好几种数据结构的实现,根据不同的数据结构可以实现不同的操作。
- HashSet:经典Set实现,不保证元素排列顺序,非线程安全,元素值可以为null(注意对象的比较,如果要保证自定义对象唯一,需要重写equals和hashCode方法)
- LinkedHashSet:从名字可以看出是链表实现的Set,按照添加元素的先后添加元素,因此性能略低于HashSet,但是在迭代访问全部元素时性能很好。
- TreeSet:从名字可以看出是树结构实现的Set,非线程安全,由于也是SortedSet接口的实现,所以元素有序,可以有序访问元素以及上一个、下一个等。
- EnumSet:专为枚举类设计的集合类,非线程安全。
-
List
- ArrayList是最常用的List实现,数组实现,允许对元素进行快速随机访问,当数组大小不满足时需要增加存储时需要将已经有数组的数据复制到新的存储空间中。当从ArrayList的中间位置插入或者删除元素时,需要对数组进行复制、移动、代价比较高。因此,它适合随机查找和遍历,不适合插入和删除。
- Vector与ArrayList一样,也是通过数组实现的,不同的是它支持线程的同步,即某一时刻只有一个线程能够写Vector,避免多线程同时写而引起的不一致性,但实现同步需要很高的花费,因此,访问它比访问ArrayList慢。但是Vector提供了一个Stack子类,即栈的实现。
- LinkedList是用链表结构存储数据的,很适合数据的动态插入和删除,随机访问和遍历速度比较慢。另外,他还提供了List接口中没有定义的方法,专门用于操作表头和表尾元素,可以当作堆栈、队列和双向队列使用。
-
Queue
队列的实现。一个特别的实现是优先队列(PriorityQueue)。如下:
1
2
3
4
5PriorityQueue pq = new PriorityQueue(); pq.offer(6); pq.offer(11); pq.offer(8); System.out.println(pq.poll()); -
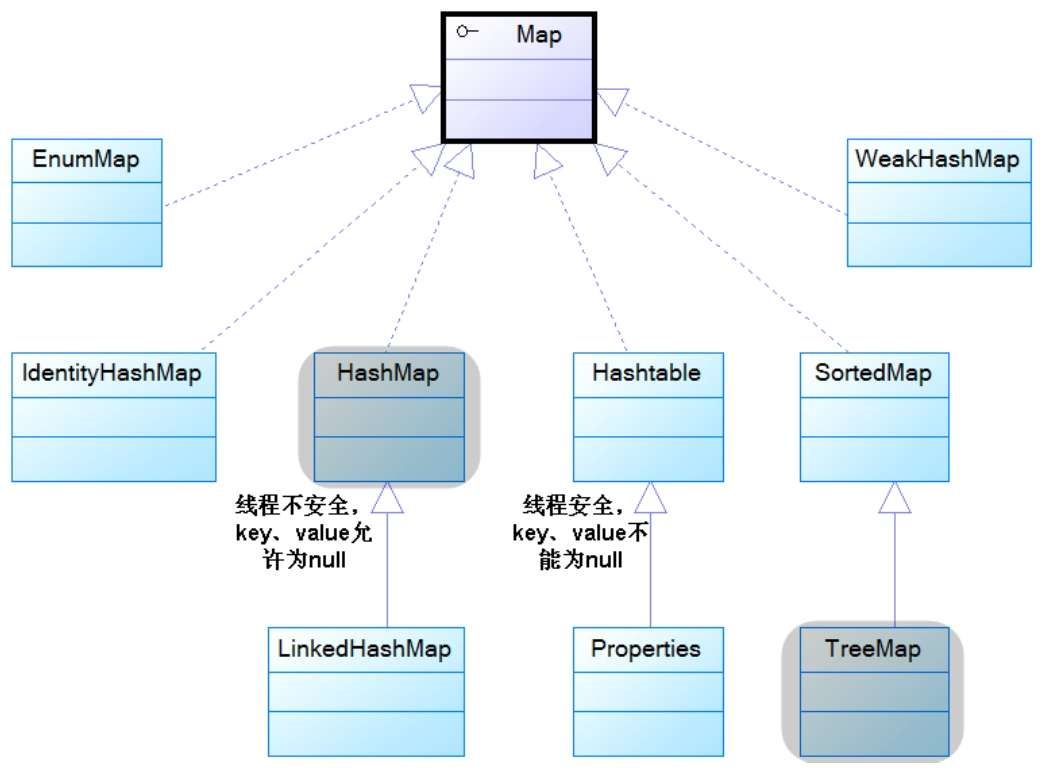
Map
字典的实现,就是key-value的形式。同Set一样,Java中也有多种实现:
- HashMap与HashTable:HashMap非线程安全,允许null为key,而HashTable则相反,HashMap是比较常用的,保证线程安全可以使用后面讲的Collection类。
- LinkedHashMap:主要是基于Hash再加上前后指针的双向链表实现,性能略低于HashMap,但是迭代全部元素时性能挺好,可以保持插入顺序或者访问顺序进行读取。
- TreeMap:基于红黑树数据结构实现,可以保证key有序。
- WeakHashMap:key对象只持有对实际对象的弱引用,当垃圾回收了key对应的对象后,此key将被删除。
- IdentityHashMap:只有当两个key对象完全相等,即==号判断为true时才是相同的key,因此可以添加两个new String(“Java”)到Map中。
- EnumMap:顾名思义,只保存枚举类的Map。
-
Collections
操作集合的工具类,提供了集合的多种操作:
- 排序操作:reverse、shuffle、sort、swap、rotate等。
- 查找替换:binarySearch、max、min、fill等。
-
同步控制:使用Collections.synchronizedXXX等方法可以让非线程安全的结合变成线程安全,但是通过Iterator、Spliterator或Stream遍历这个新List时,需要在外部做好同步。如:
1
List list = Collections.synchronizedList(new ArrayList());
泛型
JDK1.5开始增加了对泛型的支持,没有泛型之前,当把一个对象放入集合,集合会忘记这个对象的类型,也就是变成Object,拿出来的时候需要进行显式类型转换,而且容易引起ClassCastException异常。而增加泛型支持之后则不需要显式转换了。
使用泛型
Java7之前,使用泛型是这样的:
1 | |
Java7之后,可以去掉后面尖括号里面的东西了,毕竟这样显得多余。
1 | |
定义泛型
如下:
1 | |
其实就是用了一个<T>来代替我们实例化时所规定的类型。这个T其实可以是任意变量名,但是我们一般为了规范会遵循以下规则:
- E - Element (在集合中使用,因为集合中存放的是元素)
- T - Type(Java 类)
- K - Key(键)
- V - Value(值)
- N - Number(数值类型)
- ? - 表示不确定的java类型
- S、U、V - 2nd、3rd、4th types
注意其中的?,可以用来规定继承上限和继承下限。上限通配符 <? extends U> 可以代表这个未知类型 U,或者 通过关键字 extends 所能想象出的 U 类的任何一个子类。同样,下限通配符 <? super L> 可以代表这个未知类型 L,或者 通过关键字 super 所能想象出的 L类的任何一个超类。
异常
使用try-catch-finally结构进行异常捕获与处理。其中finally是可选的。使用throws关键字可以抛出捕获的异常,并且可以抛出多个。使用throw可以抛出自定义异常,注意和前面throws的区别,throws是抛出已经发生的异常。代码示例如下:
1 | |
注解
Java的注解看起来和Python的装饰器语法一样,其实效果差得远了。Python里面只要装饰起来就可以直接操作这个对象,但是Java这个注解其实就是个标记而已,如果想要操作,还要通过反射来获取对象。如下:
1 | |
- 五个基本注解类型
- @Override:复写父类方法注解,就是标记性的,加上这个注解之后编译器会检查是否正确复写,避免出现复写方法错误的问题。
- @Deprecated:标记已过时
- @SuppressWarnings:抑制编译器警告,就是取消编译器的警告提示。
- @SafeVarargs:抑制“堆污染”警告,就是将A类型的泛型对象赋值给B类型的泛型引用。
- @FunctionalInterface:函数式接口注解,加上之后就会严格检查只能有一个抽象方法。
- 四个元注解
- @Retention:修饰注解定义,指定被修饰的注解的存在方式。有RetentionPolicy.CLASS,默认值,记录在class文件中,运行时不可获取信息、RetentionPolicy.RUNTIME,记录在class文件中,运行时JVM或者反射可以获取到信息、RetentionPolicy.SOURCE,只保留在源代码中,编译时丢弃。
- @Target:修饰注解定义,指定被注解修饰的对象的类型,也有很多value值可以取。
- @Documented:修饰注解定义,在对象被javadoc提取文档时也提取注解名。
- @Inherited:修饰注解定义,指定注解可被继承。
反射
上面的注解已经使用过反射功能了。Java中的反射其实就是在程序运行时从JVM中拿到对象并对对象进行系列操作的过程,这个功能倒是和Python的装饰器功能很像了。Java的反射涉及到JVM一些底层的知识,务必要多多了解。
类加载
首先要知道一个Java程序会运行在一个JVM虚拟机中,不管你开了多少个线程,都只有一个JVM进程,这也是接下来我们只学习多线程而没有多进程的原因。当程序使用某个类时会通过加载、连接、初始化三个步骤进行操作。Java有三个基本类加载器,开发者也可以通过继承ClassLoader来实现自己的类加载器,下面是三个基本类加载器的说明:
- Bootstrap ClassLoader:根类加载器,加载Java核心类,非Java实现
- Extension ClassLoader:扩展类加载器,加载ext扩展类,父类加载器是根类加载器,但是.getParet方法并不会返回根类加载器,因为根类加载器非Java实现。
- System ClassLoader:系统类加载器,加载CLASSPATH下的类,如无特殊指定,用户自定义的类都以系统类加载器加载。
反射操作对象
下面是反射操作对象的一个例子
1 | |
动态代理
由于Java反射提供了一个Proxy的类,我们还可以利用反射特性和Proxy来实现类对象的动态代理,这在AOP面向切面编程中有着重要作用。代理一个很重要的作用就是我们可以在程序执行前后执行一些操作,如下:
1 | |
输入输出流
文件访问
通过java.io下的File类,我们可以执行一些文件相关的操作,如下:
1 | |
流对象
Java的IO流是实现输入输出的基础,把硬件、文件等输入输出都包装成Stream流式对象,可以很方便的实现输入输出操作。下面是一个把键盘输入包装成流操作的例子:
1 | |
序列化
序列化在数据存储和传输方面有着极大的作用。 Java中要实现序列化则类必须实现Serializable、Externalizable两个接口之一。下面是将对象进行序列化的例子:
1 | |
NIO新IO
Java中传统的输入输出流是阻塞式的,nio中将文件或片段映射到内存中可以高效的进行存取访问,但是由于使用方法复杂以及目前还没了解到应用场景所以暂时放一放,后面再细看。
多线程
在Java中没有多进程这个说法,只有多线程,因为一个JVM虚拟机就是一个进程。通过使用多线程可以显著提高程序效率,但是也要考虑好线程间的同步互斥问题。
使用线程的三种方法
-
继承Thread类 通过继承Thread类并重写其中的run方法。然后new这个对象执行start方法即可。如下:
1
2
3
4
5
6
7
8
9
10
11
12
13
14
15
16
17
18
19
20
21
22
23
24
25
26
27
28
29
30
31public class FirstThread extends Thread { private int i ; // 重写run方法,run方法的方法体就是线程执行体 public void run() { for ( ; i < 100 ; i++ ) { // 当线程类继承Thread类时,直接使用this即可获取当前线程 // Thread对象的getName()返回当前该线程的名字 // 因此可以直接调用getName()方法返回当前线程的名 System.out.println(getName() + " " + i); } } public static void main(String[] args) { for (int i = 0; i < 100; i++) { // 调用Thread的currentThread方法获取当前线程 System.out.println(Thread.currentThread().getName() + " " + i); if (i == 20) { // 创建、并启动第一条线程 new FirstThread().start(); // 创建、并启动第二条线程 new FirstThread().start(); } } } } -
实现Runable接口 通过实现Runable接口的run方法,实例化对象后作为target传入Thread开启新线程。如下:
1
2
3
4
5
6
7
8
9
10
11
12
13
14
15
16
17
18
19
20
21
22
23
24
25
26
27
28
29
30
31
32public class SecondThread implements Runnable { private int i ; // run方法同样是线程执行体 public void run() { for ( ; i < 100 ; i++ ) { // 当线程类实现Runnable接口时, // 如果想获取当前线程,只能用Thread.currentThread()方法。 System.out.println(Thread.currentThread().getName() + " " + i); } } public static void main(String[] args) { for (int i = 0; i < 100; i++) { System.out.println(Thread.currentThread().getName() + " " + i); if (i == 20) { SecondThread st = new SecondThread(); // ① // 通过new Thread(target , name)方法创建新线程 new Thread(st , "新线程1").start(); new Thread(st , "新线程2").start(); } } } } -
实现Callable接口 这种方法和上面的Runable差不多,但是这种方法可以有返回值。如下:
1
2
3
4
5
6
7
8
9
10
11
12
13
14
15
16
17
18
19
20
21
22
23
24
25
26
27
28
29
30
31
32
33
34
35
36
37
38
39
40
41
42public class ThirdThread implements Callable<Integer> { // 实现call方法,作为线程执行体 public Integer call() { int i = 0; for ( ; i < 100 ; i++ ) { System.out.println(Thread.currentThread().getName() + " 的循环变量i的值:" + i); } // call()方法可以有返回值 return i; } public static void main(String[] args) { // 创建Callable对象 ThirdThread rt = new ThirdThread(); // 使用FutureTask来包装Callable对象 FutureTask<Integer> task = new FutureTask<Integer>(rt); for (int i = 0 ; i < 100 ; i++) { System.out.println(Thread.currentThread().getName() + " 的循环变量i的值:" + i); if (i == 20) { // 实质还是以Callable对象来创建、并启动线程 new Thread(task , "有返回值的线程").start(); } } try { // 获取线程返回值 System.out.println("子线程的返回值:" + task.get()); } catch (Exception ex) { ex.printStackTrace(); } } } -
三种方式对比 通过继承Thread类或实现Runnable、Callable接口都可以实现多线程,不过实现Runnable接口与实现Callable接口的方式基本相同,只是Callable接口里定 义的方法有返回值,可以声明抛出异常而已。因此可以将实现Runnable接口和实现Callable接口归为一种方式。这种方式与继承Thread方式之间的主要差别如下。
- 采用实现Runnable、Callable接 口的方式创建多线程的优缺点:
- 线程类只是实现了Runnable接口或Callable接口,还可以继承其他类。
- 在这种方式下,多个线程可以共享同一-个target对象,所以非常适合多个相同线程来处理同一-份资源的情况,从而可以将CPU、代码和数据分开,形成清晰的模型,较好地体现了面向对象的思想。
- 劣势是,编程稍稍复杂,如果需要访问当前线程,则必须使用Thread.currentThread()方法。
- 采用继承Thread类的方式创建多线程的优缺点:
- 劣势是,因为线程类已经继承了Thread类,所以不能再继承其他父类。
- 优势是,编写简单,如果需要访问当前线程则无须使用Thread.currentThread()方法,直接使用this即可获得当前线程。鉴于上面分析,因此一般推荐采用实现Runnable接口、Callable接 口的方式来创建多线程。
- 采用实现Runnable、Callable接 口的方式创建多线程的优缺点:
线程的生命周期
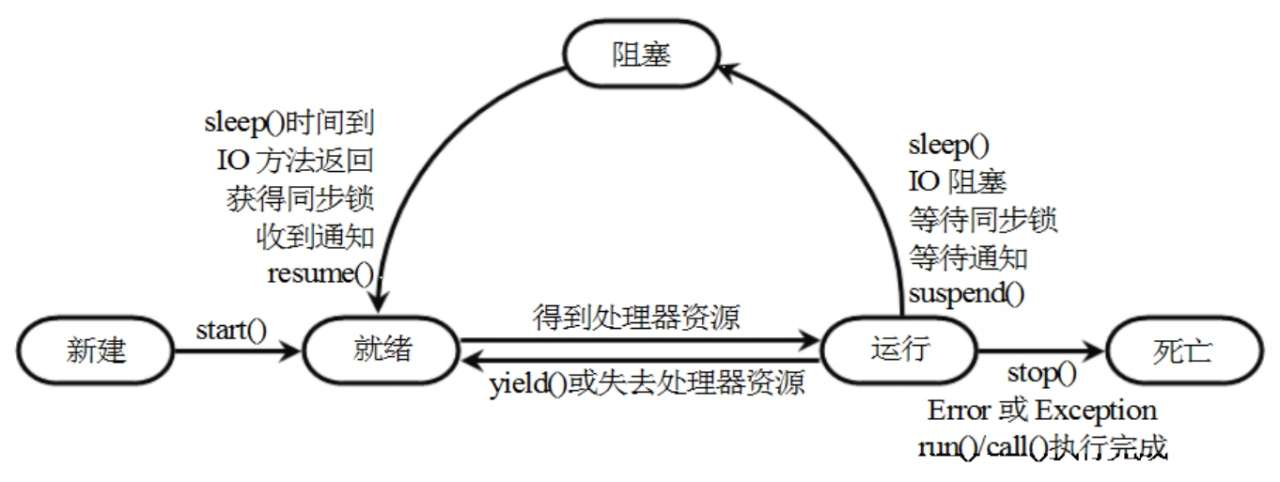
如上图所示为线程的生命周期,和操作系统中介绍的进程状态差不多。不过要注意,线程死亡状态后不能重新start,必须要重新new到新建状态才能执行。
控制线程
- join线程:使用th.join()这样的方法可以等待th线程结束后再继续执行下面的代码。
- 守护线程:使用th.setDaemon(true)可以设置当前线程为守护线程,当前台线程全部死亡后守护线程自动结束。
- sleep线程睡眠:使用Thread.sleep(1000)这样的形式可以使得当前线程阻塞一定时间,传入数值为毫秒。
- yield线程让步:Thread.yield()将处理器资源让出来给优先级相等或者更高的线程。可以用作协程。
- 改变线程优先级:Java线程优先级是1-10(不同操作系统可能会有一点差异)。可以通过Thread.currentThread().setPriority(6)进行设置。同时也有Thread.MAX_PRIORITY、Thread.MIN_PRIORITY、Thread.NORM_PRIORITY三个等级可以进行设置。
线程同步
当两个线程对同一个对象进行操作时有可能引起数据异常问题,为了解决不同线程对同一个对象的正确操作,需要进行线程同步,Java中有两个解决方案:
-
使用synchronized关键字修饰方法或者代码块
例如:
1
2
3
4
5
6
7
8
9
10
11
12
13
14
15public synchronized void drawAll(){ try{ if(flag){ System.out.println("线程:"+Thread.currentThread().getName()); System.out.println("取钱:"+balance); balance=0; flag = false; notifyAll(); } else{ wait(); } } catch (InterruptedException e) { e.printStackTrace(); }1
2
3
4
5
6
7
8
9
10
11
12
13
14
15
16
17
18
19
20
21
22
23
24
25synchronized (account) { // 账户余额大于取钱数目 if (account.getBalance() >= drawAmount) { // 吐出钞票 System.out.println(getName() + "取钱成功!吐出钞票:" + drawAmount); try { Thread.sleep(1); } catch (InterruptedException ex) { ex.printStackTrace(); } // 修改余额 account.setBalance(account.getBalance() - drawAmount); System.out.println("\t余额为: " + account.getBalance()); } else { System.out.println(getName() + "取钱失败!余额不足!"); } } -
使用同步锁
Java提供了多种锁的实现,线程安全控制中,使用较多时是可重入锁。
1
2
3
4
5
6
7
8
9
10
11
12
13
14
15
16
17
18
19
20
21
22
23
24
25
26
27
28
29
30
31
32
33
34
35
36
37
38class Account{ private final ReentrantLock lock = new ReentrantLock(); private String accountNo; private double balance; public Account(String accountNo, double balance){ this.accountNo = accountNo; this.balance = balance; } public void draw(double drawAmount){ lock.lock(); try{ if(balance >= drawAmount){ System.out.println("取钱:" + drawAmount); balance -= drawAmount; System.out.println("余额:" + balance); } else{ System.out.println("余额不足!"); } } finally { lock.unlock(); } } } public class TestLock { public static void main(String[] args) { Account a1 = new Account("Java", 100); new Thread(()->a1.draw(100)).start(); new Thread(()->a1.draw(100)).start(); } }
线程通信
为了保证线程协调运行,Java中提供了一些用于控制线程之间通知对方状况的方法。
-
传统synchronized修饰的方法
对于这种隐式同步方法,Java提供了三个函数可直接使用。
- wait():当前线程进行等待,直到其他线程执行notify()或者notifyAll()或者wait中传入的时间已到则继续抢占cpu运行。
- notify():随机通知一个线程进行运行。
- notifyAll():通知所有阻塞线程运行。
例如:
1
2
3
4
5
6
7
8
9
10
11
12
13
14
15
16
17
18
19
20
21
22
23
24
25
26
27
28
29
30
31
32
33
34
35
36
37
38
39
40
41
42
43
44
45
46
47
48
49
50
51
52
53
54
55
56
57
58
59
60
61
62
63
64
65
66
67
68
69
70
71
72
73
74
75class Account2{ private final ReentrantLock lock = new ReentrantLock(); private String accountNo; private double balance; private boolean flag = false; public Account2(String accountNo, double balance){ this.accountNo = accountNo; this.balance = balance; } public synchronized void drawAll(){ try{ if(flag){ System.out.println("线程:"+Thread.currentThread().getName()); System.out.println("取钱:"+balance); balance=0; flag = false; notifyAll(); } else{ wait(); } } catch (InterruptedException e) { e.printStackTrace(); } } public synchronized void deposit(double depositAmount){ try{ if(!flag){ System.out.println("线程:"+Thread.currentThread().getName()); System.out.println("存钱:"+depositAmount); balance+=depositAmount; flag = true; notifyAll(); } else{ wait(); } } catch (InterruptedException e) { e.printStackTrace(); } } } public class TestCommunication { public static void main(String[] args) { Account2 a2 = new Account2("Java", 0); new Thread(()->{ for (int i = 0; i < 10; i++) { a2.drawAll(); } }, "取钱线程").start(); new Thread(()->{ for (int i = 100; i < 105; i++) { a2.deposit(i*0.1); } }, "存钱线程1").start(); new Thread(()->{ for (int i = 10000; i < 10005; i++) { a2.deposit(i*0.1); } }, "存钱线程2").start(); new Thread(()->{ for (int i = 20000; i < 20005; i++) { a2.deposit(i*0.1); } }, "存钱线程3").start(); } } -
Lock锁实现的方法
由于是显式的锁,因此上面提到的三种方法不可用,但是仍然有相似的三种方法:await()、signal()、signalAll()
1
2
3
4
5
6
7
8// 显式定义Lock对象 private final Lock lock = new ReentrantLock(); // 获得指定Lock对象对应的Condition private final Condition cond = lock.newCondition(); cond.wait(); cond.signal(); cond.signalAll(); -
使用阻塞队列
Java 5提供了一个BlockingQueue接口,虽然BlockingQueue也是Queue的子接口,但它的主要用途并不是作为容器,而是作为线程同步的工具。BlockingQueue 具有一个特征:当生产者线程试图向BlockingQueue中放入元素时,如果该队列已满,则该线程被阻塞;当消费者线程试图从BlockingQueue中取出元素时,如果该队列已空,则该线程被阻塞。程序的两个线程通过交替向BlockingQueue中放入元素、取出元素,即可很好地控制线程的通信。BlockingQueue提供如下两个支持阻塞的方法。
-
put(E e):尝试把E元素放入BlockingQueue中,如果该队列的元素已满,则阻塞该线程。
-
take(): 尝试从BlockingQueue的头部取出元素,如果该队列的元素已空,则阻塞该线程。
例如:
1
2
3
4
5
6
7
8
9
10
11
12
13
14
15
16
17
18
19
20
21
22
23
24
25
26
27
28
29
30
31
32
33
34
35
36
37
38
39
40
41
42
43
44
45
46
47
48
49class Producer extends Thread{ private BlockingQueue<Integer> bq; public Producer(BlockingQueue<Integer> bq){ this.bq = bq; } public synchronized void run(){ for (int i = 0; i < 100; i++) { try { bq.put(i); } catch (InterruptedException e) { e.printStackTrace(); } System.out.println(getName() + " 生产:" + i); } } } class Customer extends Thread{ private BlockingQueue<Integer> bq; public Customer(BlockingQueue<Integer> bq){ this.bq = bq; } public synchronized void run(){ while (true){ try { int v = bq.take(); System.out.println("消费:" + v); } catch (InterruptedException e) { e.printStackTrace(); } } } } public class TestBlockingQueue { public static void main(String[] args) { BlockingQueue<Integer> bq = new ArrayBlockingQueue<>(2); new Producer(bq).start(); new Producer(bq).start(); new Customer(bq).start(); } } -
线程池
系统启动一个新线程的成本是比较高的,因为它涉及与操作系统交互。在这种情形下,使用线程池可以很好地提高性能,尤其是当程序中需要创建大量生存期很短暂的线程时,更应该考虑使用线程池。
与数据库连接池类似的是,线程池在系统启动时即创建大量空闲的线程,程序将一个Runnable对象或Callable对象传给线程池,线程池就会启动一个空闲的线程来执行它们的run)或call()方法,当run()或call()方法执行结束后,该线程并不会死亡,而是再次返回线程池中成为空闲状态,等待执行下一个Runnable对象的run()或call()方法。
下面是使用线程池的一个例子:
1 | |
网络编程
Java基本网络支持
Java的java.net包下面提供了一些网络操作的基本包,可以通过调用他们的方法进行一些基本操作,如下:
1 | |
TCP通信
-
TCP基本通信 TCP是可靠连接,通过socket可以进行tcp通信,如下是一个客户端和服务端通信的例子:
server:
1
2
3
4
5
6
7
8
9
10
11
12
13public class Server { public static void main(String[] args) throws IOException { ServerSocket ss = new ServerSocket(6666); while (true){ Socket s = ss.accept(); PrintStream ps = new PrintStream(s.getOutputStream()); ps.println("服务器连接成功!"); ps.println("欢迎使用!"); ps.close(); s.close(); } } }client:
1
2
3
4
5
6
7
8
9
10
11
12
13
14
15
16
17
18
19
20
21
22
23public class Client { public static void main(String[] args) throws IOException { String host = "127.0.0.1"; int port = 6666; Socket socket = new Socket(); socket.connect(new InetSocketAddress(host, port), 10000); socket.setSoTimeout(3000); try{ Scanner scan = new Scanner(socket.getInputStream()); while (scan.hasNext()){ String msg = scan.nextLine(); System.out.println(msg); } scan.close(); socket.close(); }catch (SocketTimeoutException ex){ System.out.println("超时!"); } } } -
TCP多线程通信 下面是一个多线程、多客户端通信的例子:
server:
1
2
3
4
5
6
7
8
9
10
11
12
13
14
15
16
17
18
19
20
21
22
23
24
25
26
27
28
29
30
31
32
33
34
35
36
37
38
39
40
41
42
43
44
45
46
47
48
49
50
51
52
53
54class ServerThread implements Runnable{ Socket s = null; BufferedReader br = null; public ServerThread(Socket s){ System.out.println(s.getPort()+" 端口客户端已启动!"); try { this.s = s; br = new BufferedReader(new InputStreamReader(s.getInputStream())); } catch (IOException e) { e.printStackTrace(); } } @Override public void run() { String msg = null; while ((msg = readMsg())!=null){ System.out.println("来自 " + s.getPort() + " 的消息:" + msg); for(Socket client: MyServer.socketList){ try { PrintStream ps = new PrintStream(client.getOutputStream()); ps.println(client.getPort() + ": " + msg); } catch (IOException e) { e.printStackTrace(); } } } } private String readMsg(){ try { return br.readLine(); } catch (IOException e) { MyServer.socketList.remove(s); System.out.println(s.getPort() + "已退出!"); e.printStackTrace(); } return null; } } public class MyServer { public static List<Socket> socketList = Collections.synchronizedList(new ArrayList<>()); public static void main(String[] args) throws IOException { ServerSocket ss = new ServerSocket(6666); while (true){ Socket s = ss.accept(); socketList.add(s); new Thread(new ServerThread(s)).start(); } } }client:
1
2
3
4
5
6
7
8
9
10
11
12
13
14
15
16
17
18
19
20
21
22
23
24
25
26
27
28
29
30
31
32
33
34
35
36
37class ClientThread implements Runnable{ private Socket s; BufferedReader br = null; public ClientThread(Socket s) throws IOException { this.s = s; br = new BufferedReader(new InputStreamReader(s.getInputStream())); } @Override public void run() { try { String msg = null; while ((msg = br.readLine())!=null){ System.out.println(msg); } } catch (IOException e) { e.printStackTrace(); } } } public class MyClient { public static void main(String[] args) throws IOException { Socket server = new Socket("127.0.0.1", 6666); new Thread(new ClientThread(server)).start(); String msg = null; PrintStream ps = new PrintStream(server.getOutputStream()); // Scanner input = new Scanner(System.in); BufferedReader br = new BufferedReader((new InputStreamReader(System.in))); while ((msg = br.readLine()) != null){ // msg = input.nextLine(); ps.println(msg); } } }
UDP通信
UDP是不可靠的连接,尽最大努力交付,在电话、视频、直播、游戏等方面用的比较多,也可以实现消息广播。如下是一个UDP实现通信的例子:
server:
1 | |
client:
1 | |
参考资料:
- 疯狂Java讲义(第三版)-李刚
- https://www.cnblogs.com/chenglc/p/6922834.html
- https://www.cnblogs.com/wanlipeng/archive/2010/10/21/1857791.html
- https://www.cnblogs.com/guanghuiqq/p/11208809.html